Do you remember when exactly Halloween started becoming popular in India?
I thought about it and thought hard but couldn’t quite recall. My first adult memory of halloween was probably over “friends’ episode of “the one with the halloween party’, where Ross came dressed as ‘spud-nik’, which no one got. I thought that was really funny but then my sister and I were hooked on to Friends like our life depended on it. There was also “charmed’ series of three witch sisters. Witches, wizards, ghouls, ghosts, banshees; you name it and all the creepy creatures were there along with the good witch sisters. There were some Halloween episodes there too. We wished that we were somewhere in the US so that we could truly celebrate Halloween. That was two decades back.
![]()
We grew up, got into jobs, got married and life took over. In all these years, Halloween and its traditions did not really cross our paths until I had a little baby boy, who grew up a little bit and started watching cartoons. Like most kids, Tugga is completely influenced by various cartoon shows, which are mostly made in the US or UK. On his bidding, Anindya and I have been celebrating Halloween for the past couple of years, in whatever little way we can. There is no trick or treating here. But I do small halloween decorations and some creepy treats. The Halloween creepy treats are always a hit with Tugga and his friends. This year, Halloween witch finger cookies are baked and ready to go into Tugga’s tiffin box, just to scare the day lights out of his friends in school. He sure is one trickster.
![]()
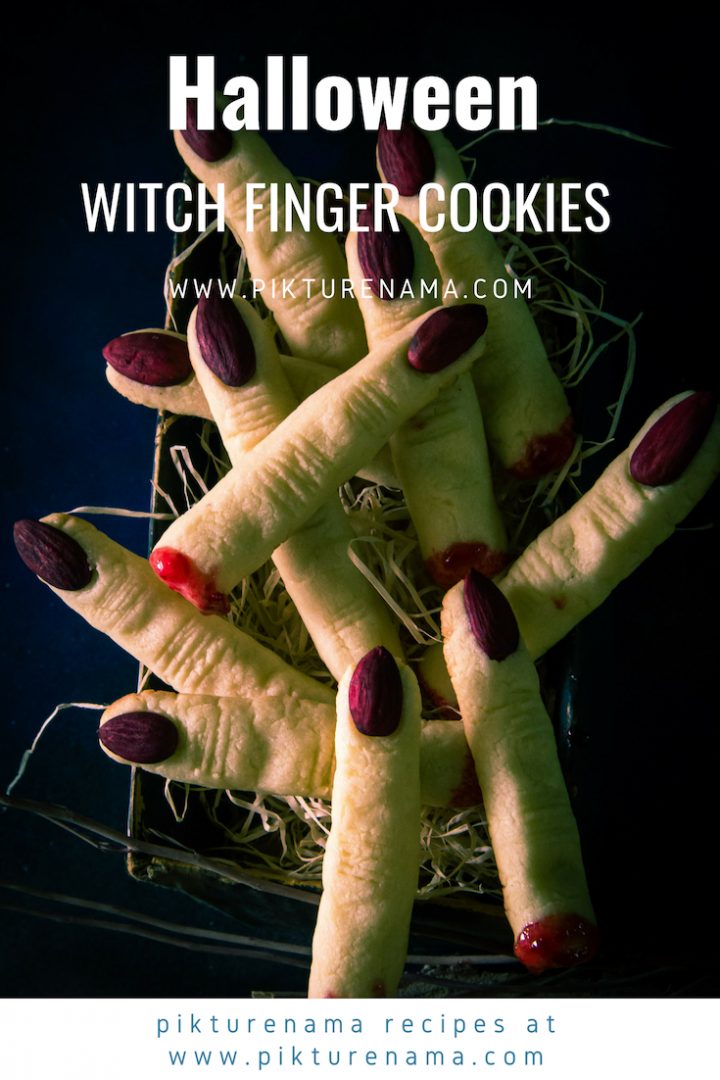
If you have never made Halloween witch finger cookies, you must do so this halloween. They are time consuming but really easy to make. More importantly, they are exceptionally creepy yet delicious. And why wouldn’t they be? Afterall they are sugar cookies made with butter, flour, sugar and eggs. The blood is from strawberry or raspberry crush or food colouring. The eggs make the cookies quite light and airy and unlike shortbread, is not so hard and dense. Once baked, the entire house has the whiff of butter, flour and vanilla. It is just divine and with every batch, I need to hold Tugga back for sometime till the witch finger cookies cool down and harden. Then it is Tugga’s job to dip the ends of the witch finger cookies into the strawberry crush to give it the final creepy effect.
![]()
Placing the nail – Colored almonds
Making knuckles
Creating the knuckles
Fingers ready to go into the oven
Looking for some creepy halloween treats? Halloween witch finger cookies are just too good to be true. Keep them in a box and hand it to whoever you want to scare. I wish I could have recorded a few shocking and funny expressions that I encountered today!!
Do try this recipe and share your feedback. You can reach out to us at our social media handles: Instagram, Facebook or any of our personal Facebook (Madhushree and Anindya) and twitter profiles. Post a picture and tag us
![]()
Pin these for future reference

Halloween Witch Finger Cookies
Ingredients
- 2 cups All purpose flour
- 1 cup Caster sugar
- 1/2 cup Butter
- 2 tsp vanilla essence
- 1 no Egg
- 1 tsp baking powder
- 36 nos almonds
- 1 tbsp red liquid food colour see notes
- 3 tbsp strawberry/ raspberry crush see notes
Instructions
- In a bowl, take the food colour and dip the almonds in the food colour. Let the almonds soak the colour for sometime.
- In a mixing bowl, cream the butter and sugar. Then crack one egg into it and whisk. The egg should be at room temperature. Add the vanilla essence and continue whisking for a minute or so till the egg completely incorporates with the butter sugar mixture.
- Now sift in the flour along with baking powder and beat it one more time. I have used an electic hand mixer for the process.
- Finally you will have to use your hands to bring the dough together and knead it into a smooth ball. Cut the dough in two parts and cover them both in cling films. (see notes)
- Turn on your oven to 160 degree c and prepare a baking tray with a cookie sheet or parchment paper.
- In a separate plate, place a kitchen towel and using a forcep, take the almonds out and spread them on the kitchen towel.
- Now take one dough and scoop out little more than a tbsp of dough from it. Roll the dough into a cylinder in the palm of your hand (shown in a picture above). One end should be narrower than the other. It should be approximately 4 to 4.5 inches long and keep them as thin as possible.
- Place the finger on the cookie sheet. Take one almond and place it at the narrower end to make the finger nail. Gently press the almond on the dough to set it in.
- Now using you little finger, make two dents in the cylinder, like shown in a picture above. This will give you the mound for the knuckles. Using the end of the knife, make many horizontal lines on the mounds to make the knuckles.
- While doing so, keep shaping the finger with your other hand. Repeat the process till you finish the dough.
- Keep a distance of 1/2 an inch between each finger while placing them on the cookie sheet.
- Bake them in the oven for about 12 - 15 minutes. You have to watch them like a hawk so that the bottom doesn't burn. Just as you see the bottom turning golden, take the cookies out and transfer the witch fingers on a wire rack to cool them down.
- Like all cookies, they are soft when they come out of the oven. Once cooled down, the witch fingers harden on the outside.
- Finally dip the other ends of the witch fingers in strawberry crush and place them on a tray before serving. The witch fingers can be stored in air tight container for a few days.
- You can also store the dough in the refrigerator for a couple of days and bring it to room temperature before rolling out.
Notes
- You can dip the almonds in gel food colour or liquid food colour. In case you don't want, you can leave the almonds as it is. Witches can have dirty brown finger nails.
- For colouring of the stubs, you can use either of the berry crushes or take some jam and heat it in a pan. Alternately, you can also use food colour for the same instead of the jam. But kids tend to love the jam/crush.
- I had cut the dough into two since the it takes quite sometime to make each finger. I made the fingers over two days. So I had kept one of the dough in the refrigerator.
- I also noticed that if you leave the dough without the cling film while rolling out, the dough tends to dry out. So best it to keep the cling film on between rolling out each finger.
- You need to roll the fingers as thin as possible (without breaking) since they expand a little bit in the oven.
- You can get creative and use green colour for the cookie dough too to make green fingers.